On this page
- Electronic Software Delivery
- Downloading and creating your ArcaOS product
- The download process
- Unpacking your download
- Four installation methods: ISO, DVD, local disk (HDD or SSD), or USB
- Burning your unpacked ISO image file to a DVD
- Creating a bootable ArcaOS USB stick for installation
Electronic Software Delivery
Generally, ArcaOS is delivered via a download link. Because each licensed copy of the operating system is personalized for the user, it is important not to share your download link. Various features of ArcaOS rely on validating your personalization data. Altering this in any way may adversely impact the functioning of the system.
Before booting the installation medium, please review the Installation Guide, the End User License Agreement, and the README.TXT file located in the root of the DVD. You may wish to copy these documents to a secondary system (if installing to the current one) or print them for reference during the installation.
Downloading and creating your ArcaOS product
The download process
After you have purchased your ArcaOS license you will not be able to immediately download the software from our website. We must first build your personalized ISO file. You will receive an email when your download of the ArcaOS ISO image is ready. This process normally takes approximately 10 minutes.
Your ISO package will remain available on our servers for download for a limited time, but you may always request a new ISO by logging into your customer portal page and visiting the original order page. Click the button to request a new ISO.
You should have adequate space to store the downloaded file. Assume 1GB for the compressed download, and another 1.4GB for the extracted ISO file.
Unpacking your download
You should move the download to an empty directory before unpacking it, or unpack it into an empty directory. Your downloaded ArcaOS ISO image and related files are compressed using 7zip, a file compression format similar to the well known ZIP file. You must first unpack the downloaded file before you may burn the ISO image to DVD or use the included utilities to create a bootable USB stick.
For your convenience, here are some links to 7zip archive tools for various operating systems:
- If you already have ArcaOS installed, 7z file format is supported directly by our Archive tool.
- For OS/2 and eComStation, you may download Zippy (a graphical tool) or 7zip (command line).
- For Windows, you may download the 32-bit or 64-bit version of 7zip (a graphical tool).
- For MacOS X, you may download the free utility Keka or p7zip (installable via Homebrew, as discussed here, or MacPorts).When installing from MacPorts, perform the install as:
sudo port install p7zip <Enter>
- For various Linux and Unix distributions, please see this page.
To unpack the archive from the command line, the syntax is generally:
7z e <filename> <Enter>
where <filename> is the full path and filename of the archive you downloaded. To direct the output to a specific directory, use the -o{Directory} switch:
7z e -o<outputdir> <filename> <Enter>
which will unpack the file to the location specified as <outputdir> (be sure not to insert a space between “-o” and “<outputdir>”).
Four installation methods: ISO, DVD, local disk (HDD or SSD), or USB
If you will be installing ArcaOS in a virtual machine, depending upon your hypervisor, it is usually sufficient to mount the raw ISO file as a virtual DVD. In this case, once the archive has been extracted, it should be ready to install.
The traditional method for installing ArcaOS is from a physical DVD. In this case, follow the directions in the next section to burn the ISO to DVD. You will not need any of the additional files from the downloaded package.
Beginning with ArcaOS 5.0.2, it is now possible to install ArcaOS from a bootable USB stick (also commonly known as a flash drive, jump drive, or thumb drive). See the section below for details of the two methods available for creating the bootable USB stick.
Burning your unpacked ISO image file to a DVD
After you have unpacked your ISO image, you must use software to burn it to a DVD. Please take the following things into account:
- The unpacked ISO image file is about 1.2 Gigabytes in size, and it must be burned onto a DVD. It does not fit on a CD.
- You should never copy an ISO as an individual file to a DVD. Instead, you must burn it directly to the DVD. Most CD/DVD burning software will automatically recognize an ISO image file by its extension and do this correctly. If yours does not, look for an option to burn a “raw” image or perhaps “image mode” in your software.
If you already have ArcaOS installed you may burn the image to disc with DVD Tools. For other operating systems, the following techniques may be helpful:
OS/2 Warp 4 and eComStation
RSJ is a good choice, if you have a full version of the product (eComStation ships with a limited function version which is not capable of burning DVD images). Alternatives are DVD Toys, dvddao, and cdrecord.
Windows 7, 8, 10, 11, and Windows Server 2008r2, 2012, 2016, and 2019
It should be sufficient to put a writable DVD in your DVD drive. Then right-click on the ArcaOS ISO file in Windows Explorer and select the menu option Burn disc image.
Unix and Linux
Burning an ISO file may vary on your Unix/Linux distribution. There are many different tools available to burn an ISO to DVD. Most modern distros include burning software which is installed by default. Here is an example of how to burn an ISO file to DVD with Ubuntu.
MacOS X (10.3 and newer)
MacOS ships with a command line utility, drutil, which should be usable for this purpose. Open a terminal, switch to the directory where the ISO has been extracted, and with blank media in the burner, run:
drutil burn <filename>
Another option is the included Disk Utility, as discussed here, and which should work with earlier OS X versions. For 10.11 and up, an alternative is to burn straight from the Finder’s menu, as discussed here.
Other Notes
You may use a DVD-RW (rewritable) for your ArcaOS installation disc. However, if you are experiencing installation issues, such as ArcaOS failing to boot from the disc or the installation not finishing correctly, try burning the ArcaOS ISO to a DVD-R (or DVD+R) disc.
Creating a bootable ArcaOS USB stick for installation
How to create a bootable ArcaOS USB stick using AOSBOOT.CMD (Standard method)
This method uses the AOSBOOT.CMD script located in the AOSBOOT directory of the ArcaOS ISO to build a bootable USB stick. This requires a running OS/2 system, with REXX capability (any ArcaOS system, for example). This is the preferred and recommended method to create a bootable USB ArcaOS install stick.
A USB stick with at least 2 GB of space is needed. Two partitions will be created on the USB stick using approximately 1.8 GB of space for the ArcaOS installation files. Some 2 GB USB sticks are actually smaller than 1.8 GB and may not be large enough. Unpartitioned USB sticks and USB sticks larger than 32 GB may require an extra step to initialize them. The aosboot.cmd script handles this automatically.
No special preparation of the USB stick is required for this method. The script will do everything. All partitions (if any) will be erased and the required partitions will be created, formatted, and populated. However, the stick must be blank or MBR format. If it is GPT, use InitDisk to initialize the stick to MBR. See Preparing USB MSD Disks for instructions.
- Go to Programs->Installed Software->ISOFS FIlesystem->ISODrive
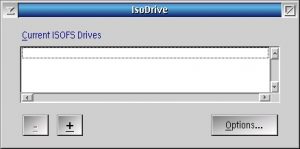
- Click +
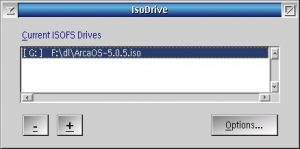
- Type the name of the ArcaOS ISO file you unzipped previously, or click … to use the GUI file selector. The dialogue will automatically choose an unused drive letter for you or you can choose your own. Remember this drive letter. For the purposes of this example, let’s assume your ISO file is f:\dl\ArcaOS-5.0.5.iso and the drive letter it got mounted on is G:.
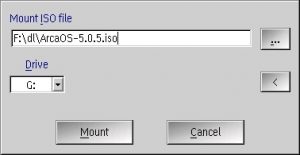
- Click Mount. The ISO file gets mounted as drive G:.
- Plug in the USB stick you want to build. For this example, let’s assume it got mounted as drive H:.
- Open a Command Prompt
- Navigate to the aosboot directory on the drive letter on which you just mounted the ISO:
g:
cd aosboot
- Type the command to build the USB install stick:
aosboot h: f:\dl\ArcaOS-5.0.5.iso
- Answer yes to continue and wait for it to finish. This will build a bootable ArcaOS install stick on drive h: using the ISO file f:\dl\ArcaOS-5.0.5.iso.
That’s it! Your USB stick is ready to use to install ArcaOS.
Note that you could use a DVD if you burned one instead of mounting the ISO file. Just put the DVD into the drive and then start from step 5 using the drive letter of the DVD instead of G: in the example.
You can also create a bootable install partition on your hard disk instead of using a USB stick. Just create a partition between 1.8G and 2G in size on your hard disk, and use that drive letter instead of h: in step 8 of the example.
Note that it is not possible to copy the USB stick image to a local disk partition and have it function properly. The partition must be created by the AOSBOOT.CMD script. Additional details are available in the aosboot.txt file in the AOSBOOT directory.
How to create a bootable ArcaOS USB stick using the image utility (Alternate method)
It is possible to create (write or restore, actually) the image of a bootable ArcaOS USB stick under practically any major operating system, from Windows 2000 through Windows 10, most modern Linux distros (2.4 kernel and newer), and Mac OSX, as well as from OS/2 versions from Warp 4 and newer, all versions of eComStation, and of course, from another ArcaOS installation.
This method should only be used if you cannot use the Standard method above.
In the same directory where you previously unpacked the ArcaOS ISO,you will find several additional files:
aosboot.dfs
arcaos-n.n.n-xx-usb.imz
dfsanlinux
dfsanmacos
DFSANOS2.EXE
dfsanwin.exe
readusb.txt
(where n.n.n and xx are the ArcaOS version and language matching the ISO which you have downloaded)
Before proceeding, be sure that you have a reliable backup of the system on which you are running the stick creation utility. The creation of the bootable stick is a destructive procedure, and selecting the wrong device will result in loss of data.
Insert a USB stick of at least 1799MB in size to be overwritten. You will be given a confirmation prompt during the procedure. Be sure that you are directing the image to the right device.
OS/2 Warp 4, eComStation, and ArcaOS
Run the following from an OS/2 command prompt:
dfsanos2.exe -q run aosboot.dfs <Enter>
Skip to step 5.
Windows 2000, XP, Vista, 7, 8, and 10, and Windows Server 2008r2, 2012, 2016, and 2019
Run the following as Administrator from a command prompt:
.\dfsanwin.exe -q run aosboot.dfs <Enter>
TIP: To get to the Command prompt, or Power Shell prompt in later versions of Windows, display the directory in Windows, then click File, and select to open Command Prompt or Power Shell, then select the option to open in administrator mode.
Note 1: We have had reports of difficulty with Windows 10 prompting to scan the drive after attempting to remount it. This is under investigation.
Note 2: If the process reports access denied or otherwise fails to erase the USB stick, see Additional notes for Windows.
Skip to step 5.
Unix and Linux (kernel 2.4 and above)
Run the following from a terminal with appropriate permissions:
chmod +x dfsanlinux <Enter>
sudo ./dfsanlinux -q run aosboot.dfs <Enter>
Skip to step 5.
Mac OS X (through Catalina, 10.15.7)
Run the following from a terminal with appropriate permissions:
chmod +x dfsanmacos <Enter>
Insert stick and unmount any existing filesystems on it first (skip this step if the stick has already been wiped):
sudo ./dfsanmacos disklist <Enter>
diskutil unmountdisk /dev/rdisk# <Enter>
(where # is the device number as reported in the disk list, e.g., rdisk2, rdisk3, etc.)
Finally, run:
sudo ./dfsanmacos -q run aosboot.dfs <Enter>
- Assuming the USB stick is the smallest disk in the system, it should be selected as the target automatically. Note that if you have configured a RAM disk or some other device smaller than the intended USB stick, this may be seen as the target device, so review the automatically selected device and confirm before proceeding. If the target should be a different disk, respond N to the confirmation prompt, and restart the procedure as:
dfsanxxx -q run aosboot.dfs <disk no> <Enter>
(where xxx is the platform executable designation and <disk no> refers to the number shown in the disk list for your intended target)
Again, confirm the target of the operation. To find the disk number in the disk list, note the following example:1 = MBR disk /dev/sda Disk1 - 114473 MiB Size: 111.79 GiB 2 = MBR disk /dev/sdb PAE_RAM_DISK Size: 4.47 GiB 3 = MBR disk /dev/sdc Disk3 - 15268 MiB Size: 14.91 GiB ^
The first column displays the disk number (3). In this example, the following command would explicitly target disk 3:
dfsanxxx -q run aosboot.dfs 3 <Enter>
- Once the image has been written, eject and reinsert the stick.
- Copy ArcaOS-5.0.5.iso to:
\ARCA_ISO\ARCAINST.ISO
or, on Linux or Mac:
/ARCA_ISO/ARCAINST.ISO
CAUTION
On operating systems which are case sensitive and/or VFAT-capable, ensure that the ISO filename is specified in UPPER CASE.
The resulting USB stick should function exactly the same as one built using the AOSBOOT.CMD script.
Additional notes for Windows
In some circumstances, on some versions of Windows, the OS will block low level operations attempted on the USB stick. If this occurs, the following steps may help before proceeding with step 2, above:
- Ensure the USB flash drive is plugged into the USB port on your PC.
- Launch an admin Powershell or cmd.exe session.
- Type “diskpart” at the prompt, then press <Enter>.
- The diskpart utility may take a few moments to spin up. Once it does, type “list disk” at the DISKPART> prompt.
- Note the number that corresponds to the USB drive, then type “select disk” followed by the drive number. Press <Enter>.
- Type “clean” at the prompt and press <Enter>.
This will completely wipe the drive and any residual partition mapping. Proceed with step 2, above.
This entry last updated: by